メールサーバーの構築をしてみようと思う。
きっかけは友達にメールサーバーの設置方法を教えてほしいと言われたからだ。(なんと単純な…)
まずは実験ということでMac上のParallels DesktopにDebianをクリーンインストールし、一から設置しようと思う。(成功してません)
目標:Postfix + PostfixAdmin + MySQL + Courier-IMAP でOP25B対策付きのPOP/IMAP 仮想ユーザー環境
クリーンインストールからの実験なのでSQLのインストールも一からする。ということはApacheとかも…
ということでめんどくさいのでセキュリティと保守性は無視していきます。
とりあえず本格的な設定に入るまで…(Courier-IMAPにはまだ手をつけてません)
Apache2のインストール
<code>$su
#apt-get install apache2
#apt-get install php5 php5-dev
#apt-get install libapache2-mod-php5</code>
そして「/etc/apache2/sites-available/default」を以下のように編集(セキュリティーは気にしていない)
<code>NameVirtualHost *
<VirtualHost *>
ServerAdmin webmaster@localhost
DocumentRoot /var/www/
<Directory />
Options FollowSymLinks
AllowOverride All
</Directory>
<Directory /var/www/>
Options Indexes FollowSymLinks MultiViews
AllowOverride All
Order allow,deny
allow from all
# This directive allows us to have apache2's default start page
# in /apache2-default/, but still have / go to the right place
</Directory>
ScriptAlias /cgi-bin/ /usr/lib/cgi-bin/
<Directory "/usr/lib/cgi-bin">
AllowOverride None
Options ExecCGI -MultiViews +SymLinksIfOwnerMatch
Order allow,deny
Allow from all
</Directory>
ErrorLog /var/log/apache2/error.log
# Possible values include: debug, info, notice, warn, error, crit,
# alert, emerg.
LogLevel warn
CustomLog /var/log/apache2/access.log combined
ServerSignature On
</VirtualHost></code>
で、Apache2の再起動。
<code>#/etc/init.d/apache2 restart</code>
MySQLのインストール
<code>#apt-get install mysql-server-5.0
#apt-get install mysql-client
#apt-get install mysql-common
#apt-get install php5-mysql</code>
ここでMySQLのユーザーの設定をする。
やることはrootのパスワードを設定する。
<code>#mysqladmin -u root password '設定したいパスワード'
#mysql -u root -p</code>
として、MySQLにログインし、以下のように作業をする。
<code>Enter password:
Welcome to the MySQL monitor. Commands end with ; or g.
Your MySQL connection id is 10
Server version: 5.0.32-Debian_7etch5-log Debian etch distribution
Type 'help;' or 'h' for help. Type 'c' to clear the buffer.
mysql> select host,user,password from mysql.user; //ユーザーの確認
+-------------+------------------+-------------------------------------------+
| host | user | password |
+-------------+------------------+-------------------------------------------+
| localhost | root | *9CFBBC772F3F6C106020035386DA5BBBF1249A11 |
| test-debian | root | |
| localhost | debian-sys-maint | *C23DC1F950ACBE84A7EAD04697082E8FEC3D7403 |
+-------------+------------------+-------------------------------------------+
3 rows in set (0.00 sec)
mysql> delete from mysql.user where user="debian-sys-maint"; //不要なユーザーの削除
Query OK, 1 row affected (0.00 sec)
mysql> set password for root@'test-debian'=password('設定したいパスワード'); //test-debianドメインのrootのパスワード設定
Query OK, 0 rows affected (0.00 sec)
mysql> select host,user,password from mysql.user; //ユーザーの確認
+-------------+------+-------------------------------------------+
| host | user | password |
+-------------+------+-------------------------------------------+
| localhost | root | *9CFBBC772F3F6C106020035386DA5BBBF1249A11 |
| test-debian | root | *9CFBBC772F3F6C106020035386DA5BBBF1249A11 |
+-------------+------+-------------------------------------------+
2 rows in set (0.00 sec)
mysql> exit //ログアウト
Bye</code>
以前の記事を参考にphpMyAdminを入れると便利。
Postfixのインストール
<code>#apt-get install postfix postfix-mysql postfix-tls</code>
インストール時に設定を求められます。
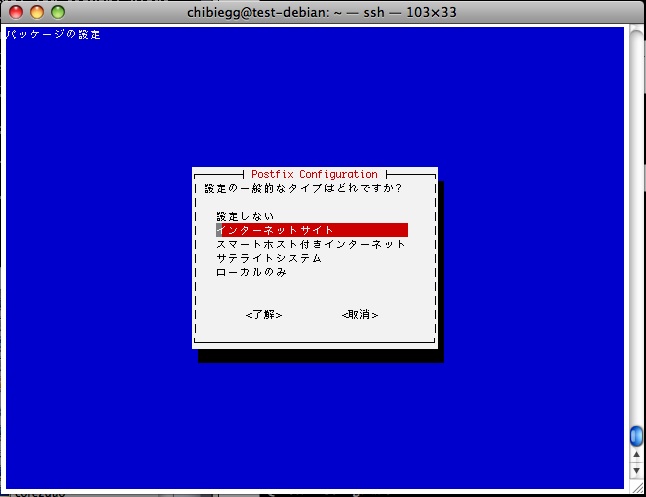
「了解」を選択し、
「インターネットサイト」を選択し、
「chibiegg.net」に設定しました。
PostfixAdminのインストール
<code>#cd /usr/src</code>
「http://www.high5.net/postfixadmin/」から最新版をダウンロード
<code>#wget http://jaist.dl.sourceforge.net/sourceforge/postfixadmin/postfixadmin-2.2.0-rc3.tar.gz #tar -zxvf postfixadmin-2.2.0-rc3.tar.gz #mv ./postfixadmin-2.2.0-rc3 /var/www/postfixadmin #cd /var/www/postfixadmin #mysql -uroot -pパスワード < DATABASE_MYSQL.TXT</code>
ここで「http://サーバーのIPアドレス/postfixadmin/setup.php」に接続すると以下のようなページが見れればOK。
まだMySQLに接続できないなどエラーがありますが、postfix用のユーザーの設定をすれば行けるでしょう。

まだまだ続きます。続きは明日。
コメントを残す